Showing posts with label SammyAndTheKitchen. Show all posts

Monday, March 23, 2015

Breakfast Idea/Bread Replacement

Hey!

I know I've been M.I.A and that's pretty much because I've been busy with college and stuff as this is my last year of college and I have tonnes of work to do, performances, et cetera. I'm just taking a few minutes now to blog this recipe because I think it's pretty awesome and I don't want to forget to blog it before I head back to school because I do not blog when I'm in school.

Okay! So, I invented this recipe just last night when I was pretty peckish, I had eaten a lot of large plums and other stuff and....I felt like just having a sandwich or something and there was no bread in the house. (And yeah, in case you didn't know, I eat bread. Usually brown/wholemeal as I prefer their taste. Sometimes, bread is the easiest vegetarian/vegan thing to find in a place full of meat-eaters so.....yeah, I eat bread).

Okay! So, (I start sentences like this a lot....just noticed). So, I decided to experiment a bit and got out 2 ingredients and tried making a quick and relatively healthy bread replacement out of them and it turned out to be pretty awesome. I tried it again for breakfast today and it was so good that I ended up making too batches of it! Here are the ingredients:

Ingredients
Rolled wholegrain oatmeal (or whichever you can find) / Muesli
Coconut milk (I used one whose nutritional information showed that it was high carb, low fat, low protein)
Extra virgin olive oil
Hot water

Method

  • Pour as much oatmeal/muesli as you desire in a bowl or a cup
  • Add some coconut milk to eat, just enough to make the oats squidgy (or a little more than just squidgy)
  • Pop the bowl/cup in a microwave for about 30 seconds or more depending on how much oats you used. Basically, you will want to take the bowl/cup out when the oatmeal/muesli is really hot and.....mushy....is that the right word to use?
  • Once the oatmeal/muesli is out of the microwave, line an oven tray/dish/baking sheet with some aluminium foil/non-stick paper/parchment paper
  • Pour about half a teaspoon of extra virgin olive oil onto the foil/paper and spread it around using a paper towel
  • Lighten up your oatmeal a bit with a tablespoon or two of hot water (or a little more depending on how much oatmeal you used)
  • Scoop your oatmeal/muesli a tablespoon at a time onto your foil/paper and spread it around evenly ensure there are no open spaces, gaps or breaks in it.
  • Pop you over tray/baking sheet into the oven at 220 degrees (I believe my oven works in celsius) or, preferably, you could put it in the grill section/on the grill setting of your oven an at a gas mark of 6.
  • Check on it every minute and once the top has browned up a bit and you can touch it and not feel moist oatmeal or have oatmeal getting on your finger, using a spatula, carefully flip the oatmeal bread replacement thingy (I need to come up with a name for this) over and let the other side cook too.
  • Once it is done, take it out and place it on a plate.
  • I prefer to eat this with some strawberry conserve/fresh strawberries mashed up together and spread on like a jam.
This is an awesome bread replacement that I believe is actually healthier than the commercially bought breads (even the breads that are advertised to be healthy).

If you give it a try, let me know what you think, okay?

I hate oatmeal. However, I really like oatmeal pancakes and this bread replacement that I made.
Also, you should note that this bread replacement does not contain sugar. However, if you wish to sweeten it up a bit, you can add some sugar to the recipe. I will recommend using a raw, unrefined sugar such as organic raw coconut sugar or raw cane sugar.

Wednesday, December 17, 2014

Awesome Oatmeal Pancake Recipe


So.....I made oatmeal pancakes for the first time today (and I also tried them for the first time) and they tasted really, REALLY good! You see, ever since I was a kid, I have pretty much hated oatmeal and, well, I tried some oatmeal again a few days ago and I still hated it. Fortunately, I made a very, very little bowl of it so I didn't feel too bad about tossing it in the bin after having less than a teaspoon of it. So, yeah, I was slightly sceptical about trying oatmeal pancakes, but I still gave it a shot (using a little bowl to make the batter so I don't waste tonnes of food if I don't like it).
After making my batter, without following a recipe, I made one oatmeal pancake, tasted it, and then I like totally scoffed it down. Like I don't scoff anything down like that apart from fruits. And I scoffed it down using my fingers. And I don't scoff anything down using my fingers apart from ripe persimmons. So, yeah, it was that good.
Anyways, here's my recipe!

><>

Ingredients
8 tbsp Oatmeal (I used Simple.... Porridge Oatmeal (Not quite sure where it was bought))
1.5 tbsp Plain Flour
Milk
Hot water
Sugar
Salt
Extra Virgin Olive Oil
Sunflower Oil

Preparation

  • In a bowl, pour out your oatmeal then add about 4 tablespoons of almost-boiling water to it and mix it up thoroughly to soften the oatmeal (add a little more water if desired).
  • Add the flour to the oatmeal in the bowl following by a splash of milk and combine the ingredients using a fork, adding more milk (and a pinch of oatmeal once or twice during the process (no hot water added to soften this addition)) and mixing till you have reached your desired consistency (which shouldn't be too light or as light as the mixture for regular pancakes).
  • Add about a tablespoon of sugar to your mixture followed by 1/5 of a teaspoon of salt and 1/2 a teaspoon of extra virgin olive oil. Mix the ingredients in thoroughly.
  • In a hot pan, pour in no more than a teaspoon of sunflower oil (I used less than this because my pan was already hot from making regular pancakes), move the pan around to spread out the oil and then pour in your desired amount of oatmeal (I don't really like my pancakes thick like most oatmeal pancakes are so, I don't add that much "batter" at a time to my pan) moving the pan around to get it to your desired shape.
  • Within seconds, the side of the mixture touching the pan will be brown/golden and that means that it's time to flip the pancakes! Please use a spatula thingy (very kitchen-y, technical term, aye?) and don't try to flip these pancakes by just giving the pan a jolt or whatever and please be patient. The new side facing the pan will not get as brown before the pancakes are done.
Bon appétit!

(I hope this tastes as good as the pancakes I made because I pretty much eyeballed the ingredients when I made it and I'm hoping that the measurements I think my eyeballing was equivalent to are right)

Saturday, October 25, 2014

Curry Noodles


This is not my recipe, but one that looks totally delicious and I really want to try it!
It is 100% raw and 100% vegan, but I'm sure it's bound to taste better than cooked food and I think it's just going to be like an amazing 'party in your mouth.'
This recipe was made by Kristina Carrillo-Bucaram who is popularly known as "FullyRaw Kristina" and well....it was from finding her online that I learnt about the raw vegan lifestyle, decided to detox by going raw vegan and changed my lifestyle (still vegetarian, but I eat 4-6 times a day with 1-3 of the meals being raw vegan and 3 being cooked (vegan or vegetarian)). She is such an awesome and happy person!
><>

"Here's what she says about this recipe:
If you like curry, you will LOVE this FullyRaw Curry Noodle recipe! It’s fresh in flavor, savor, richness, and nutrition! This delicious dish is so flavor-filled that it will have your tastebuds bursting with flavour!"
><>


Ingredients:
3-5 large zucchinis (we call them courgettes here in England)
3-4 small navel oranges
1-2 cups of orange/red cherry tomatoes
2 Tbps to half a cup of raw, unhulled sesame seeds
Fresh herbs of basil, sage, and rosemary
1 Tbps of tumeric
1 Tbps of curry powder
A pinch of cumin


Directions:

Spiralise your or Julienne peel your zucchinis to make the noodles.

Next, blend the rest of the ingredients together in a high speed blender (e.g a Vitamix) until completely smooth and creamy.

Pour the "sauce" the noodles and mix well. 

Bon appétit! :)

Monday, August 18, 2014

Raw Courgette/Zucchini Dish

Picture gotten from EricadHouse

Hey!

I know it's been forever since I last put up a recipe on here. So sorry. :(
The recipe I am putting up today is a raw vegan one. Raw vegan. Random, right? Well....I'm on a 14 days raw vegan detox and for 6 days now, I've been eating as a raw vegan. I've learnt a couple of things since I started this detox and come up with the most delicious meals. Here's one of them that I've had twice in the past 3 or so days now.

Ingredients
1 courgette (known as 'zucchini' in the States)
1 medium sized tomato
1/3 of a red/purple onion
1/3 of a yellow bell pepper

Method

  • Using a peeler (one similar to a Julienne Peeler), shred up a courgette making sure not to shred up or put the seeds/the core in the bowl you are shredding into. You may choose to peel the skin off of the courgette first, but I've only done that once and I actually kinda like the skin on for this dish.
  • Add some water to the bowl containing the courgettes (enough to cover the courgettes) and leave the courgettes in for about 20-30 seconds before draining out the water thoroughly.
  • Dice up the tomato and mix it in with the courgettes
  • Dice up the onion and bell pepper and mix it in with the courgettes too.
  • Leave the courgette dish to sit and "marinate" for a minute or two (maybe 3) and then eat it. It tastes amazing.
Bon appétit! :)

Saturday, July 12, 2014

My Latest Pasta Dish

I made that!! :)

So....I tried something a little different with my pasta cooking today and it turned out pretty good! Here's my recipe:

Ingredients
Authentic Italian Fusilli Pasta :)
1 Beefsteak Tomato
1 and 1/2 medium-sized onions
2 garlic cloves
Salt
Black Pepper
Mixed Herbs
A hot pepper
Paprika
Sunflower Oil
Olive Oil
3 well-beaten eggs


Method

  • Roughly chop your beefsteak tomato, onions and garlic cloves, place them in a glass bowl (with all the liquid that comes out of the tomato, sprinkle with 1/4 of a teaspoon of salt, a dash of black pepper, mixed herbs, paprika and olive oil. Seal the bowl with cling film/plastic wrap and leave at a maximum of 2.5 feet away from a window for 2-4 hours (the longer, the better).
  • In a pot, pour in about 6-7 handfuls of pasta followed by boiling water and a pinch of salt. Turn the heat on to max and leave the pasta to cook for about 10 minutes (or as long as the instructions on the pack of pasta says).
  • Towards when the pasta is done, get a pan, heat up about 2 tablespoons of sunflower oil and then add in your raw mixture (from the glass bowl), as it cooks, stir occasionally ensuring that nothing burns or forms brown edges. Add a little more salt and some of your choice of hot pepper to taste.
  • When the pasta's done, turn down the heat on the pan and drain out the water in the pot of pasta.
  • Next, add your pasta to the contents of the pan mixing and stirring and let the pasta and veggies cook together. Turn up the heat under the pan.
  • Beat about three eggs till they are nice and fluffy then make a well in the middle of the pan and pour your eggs in. Stir, mix and turn the contents of the pan to make sure nearly all, or all of the pasta gets some egg on it. You can add more salt and pepper to taste if you think you need more.
  • Keep stirring until the egg is no longer raw before turning off the heat.
Best eaten immediately after being cooked.

Bon appétit! :)

Thursday, July 10, 2014

Did someone say, "pasta salad?" :)

picture gotten from BubbleWS

So, yesterday, I didn't feel like having a proper lunch so, I decided to make a pasta salad that I'll eat (and then decided to eat the pasta salad as my dinner).
Okay! So, this was the first pasta salad I had ever made and it ended up being the best that I had ever tasted. Half of the ingredients in it were raw and the other half were cooked which made it quite healthy. Here's my recipe:

Ingredient
Umm.....fusilli pasta (GOTTA HAVE THAT FUSILLI! :) )
2 eggs
1/2 of a plantain
4-5 cherry tomatoes
1/3 of a small onion
2/3 of one garlic clove
Salt
Pepper (I used some black pepper and a dash of hot peppers)
Paprika
Olive Oil

Method

  • Place two eggs in a pot of boiling water and leave them to boil for 30 minutes before turning off the heat and swapping the water in the pot for cold water (carry on with the other steps while the eggs are boiling).
  • Slice a plantain horizontally to make 2 equal-ish halves. Store one of them. With the second half, slice it vertically to make two near equal halves. Slice each of this halves vertically once again to leave you with 4 "sticks" of plantain. Next, horizontally cut the sticks into about 1x1cm-ish (at least) cubes and pour them into a deep fryer for a couple of minutes (till they're nearly chocolate-brown)
  • Pour about 2-3 handfuls of fusilli pasta into a pot of boiling water, spice up the water with some salt, paprika and your choice of peppers, place it on the hob and cook that pasta for no more than 10 minutes (or whatever your pasta's cooking instructions say).
  • On a chopping board, roughly chop/dice the onions and garlic. Slice each tomato open horizontally to make two equal halves then slice each half horizontally and vertically. Place everything in a glass bowl with a drizzle of olive oil, stir and mix them up well. Cover the bowl with some cling film/plastic wrap and leave it at a maximum of two and a half feet away from a window.
  • Once the eggs are done, cut them up just like you did with the tomatoes and pour them into your raw bowl.
  • Once the pasta's done, drain it and pour it into the bowl of raw goodies.
  • Once the plantain's done, drain out the excess oil on it and pour it into the bowl of rawness.
  • Next, give everything a good stir and mix.
  • Cover up the bowl again, but only partially and leave it by the window for a few minutes just for it to cool down a bit.
  • Cover the bowl up fully and pop it in your fridge.

Now, I know that pasta salads can last for about 3-4 days, but I advice that they are eaten up the day they are made not just for health reasons, but because most of the nutrients in the raw ingredients at the time of making the salad will still be intact.


Bon appétit! :)

Wednesday, July 9, 2014

Easy Meal


Hey,

So, I've discovered a meal that can be made if you have loads of work to do. You could be cleaning up the house, or working on mini dissertation-like thing (like I've been doing) or whatever keeps you busy or stressed out and still be able to cook and eat something really good when you have the time to finally get some food into your system.

Ingredients
ASDA Mediterranean Vegetables with Cherry Tomatoes (should be available at walk mart)
3/4 of an onion
2-3 garlic cloves
Salt
Hot, ground peppers
Black pepper
Paprika
Sunflower/Extra Virgin Olive Oil
Rice
Water


Method

  • Preheat your oven to about 200C.
  • In an oven tray with relatively high sides, drizzle a bit of oil then pour in the contents a frozen bag of ASDA Mediterranean Vegetables with Cherry Tomatoes.
  • Dice the onion or cut it up irregularly, cut each garlic clove into tiny pieces and pour both into the tray.
  • Next,  season the contents of the tray with salt, a sprinkle of black pepper and paprika and some hot, ground pepper.
  • Drizzle some more oil over everything, turn and stir them to ensure the spices are near-evenly spread.
  • Add a bit of water to the tray and then place it in your over for an hour, but it's best to put it in for a half hour, stir it then put it in for another half hour.
  • Wash or rinse some rice until the water runs clear then pour it into a rice cooker with an ample amount of water.
  • Season....the water....with some salt, put the lid down on the cooker and turn it on.
  • After an hour of what's in the oven being there, if you're not ready to eat yet, just turn off the oven leaving the tray in there.
  • When the rice is done cooking, leave the rice cooker on warm if you're not ready to eat.
  • When you are eventually ready to eat, get a nice bowl, plate or dish, pour some rice into it and then place the contents of the tray over the rice. You can mix it up while you're eating.
Bon appétit! :)

Monday, June 30, 2014

Spicy Rice


This recipe is practically the same as my amazing fusilli recipe. If you haven't read that recipe yet, read it before you read this one, okay? :)


Ingredients
Long grain rice
1 Shallot
4-5 tablespoons of Dolmio ("spicy") pasta sauce (depending on how much pasta you're making)
African Yellow Pepper/Cameroon Pepper/Any really hot pepper you can get your hands on
Salt
1 Egg
Sunflower Oil


Method

  • Pour as much rice as need into a pot, boil some water, pour it over the rice, turn the heat under the pot to max. and cook the rice for about 10 minutes (or until it's done)
  • While the rice is cooking, cut up (could be in a regular or irregular shape) one shallot
  • In a frying pan, pour in about a tablespoon to a tablespoon and a half of sunflower oil and before it gets hot, pour in the cut up shallots and a dash of salt (this will not only get the shallots cooked, but also infuse the oil with the taste of the shallots).
  • When the shallots have softened (and before they start browning), pour in the few table spoons of Dolmio sauce, stir everything in the pan together well.
  • Add as much of the hot pepper you can get your hands on to the contents of the pan (I love my food spicy so I add A LOT)
  • Fry everything for about 30 seconds stirring continuously
  • Pour the rice into the frying pan.
  • Stir and turn over the contents of the pan till the colour of every rice grain has changed to at least a faint one of that of the pasta sauce and let the everything cook a little (you can add a little more oil here if you think it's needed)
  • I would usually add some more pepper here, but you don't have to.
  • Next, crack and egg and beat it in a cup or bowl, pour it into the frying pan and stir and turn over the contents of the frying pan to coat the rice with the egg.
  • Let everything sit in the pan stirring occasionally until the egg is not visibly raw anymore before turning off the heat.
  • Get a bowl, dish some rice into it.
  • Get more bowls, be nice and share your rice with friends. Who knows? They might start paying  for you to make it every day.

The Amazing Fusilli


I have this crazy, new obsession with Fusilli. We were "introduced" when I went to Tesco, stood in the pasta section and couldn't decide if I wanted my beloved organic spaghetti or some other form of pasta and then a friend said, "get this one," and handed a pack of fusilli over to me.

Fusilli cooks to perfection in exactly 5 minutes. Like 5 minutes on the dot! Isn't that amazing! Especially for a college student!

Here's how I enjoy my lovely, lovely Fusilli

Ingredients
Fusilli pasta (of course)
1 Shallot
2-3 tablespoons of Dolmio ("spicy") pasta sauce (depending on how much pasta you're making)
African Yellow Pepper/Cameroon Pepper/Any really hot pepper you can get your hands on
Salt
1 Egg
Sunflower Oil


Method

  • Pour as much fusilli as need into a pot, boil some water, pour over the fusilli, turn the heat under the hob to max. and cook the pasta for exactly 5 minutes (set a timer if you have to)
  • While the pasta's cooking, cut up (could be in a regular or irregular shape) one shallot
  • In a frying pan, pour in about a tablespoon to a tablespoon and a half of sunflower oil and before it gets hot, pour in the cut up shallots and a dash of salt (this will not only get the shallots cooked, but also infuse the oil with the taste of the shallots).
  • When the shallots have softened (and before they start browning), pour in the few table spoons of Dolmio sauce, stir everything in the pan together well.
  • Add as much of the hot pepper you can get your hands on to the contents of the pan (I love my food spicy so I add A LOT)
  • Fry everything for about 30 seconds stirring continuously
  • Drain out 99% of the water in the pot the pasta was in and pour the pasta into the frying pan.
  • Stir and turn over the contents of the pan till the colour of every fusilli has changed to at least a faint one of that of the pasta sauce and let the everything cook a little (you can add a little more oil here if you think it's needed)
  • I would usually add some more pepper here, but you don't have to.
  • Next, crack and egg and beat it in a cup or bowl, pour it into the frying pan and stir and turn over the contents of the frying pan to coat the fusilli with the egg.
  • Let everything sit in the pan stirring occasionally until the egg is not visibly raw anymore before turning off the heat.
  • Get a bowl, dish some pasta into it.
  • Eat then get up, make some more of this and eat it up again.

Saturday, June 7, 2014

College Pasta

I do not own this picture


So.... I know I haven't uploaded anything on here in a while. Anyways, what I'm about to post is a pasta recipe. I call it 'College Pasta' because I'm a college student, while school's in session, I live in school (it's hours away from home) and when I need to cook something quickly, I make pasta and it tastes good!
So, this is basically a quick and easy recipe. Here are the ingredients:


Ingredients

Organic Italian Spaghetti (or any pasta of your choice)
Water
Dolmio Tomato Sauce (Spicy)
Shallots
Spinach (optional)
Salt
Nigerian Pepper (courtesy of my mum ;))*
Olive Oil or Sunflower Oil

*Wanna get your hands on some Nigerian Pepper? You can find it in some Indian shacks or Indian Supermarkets in England


Method


  • Put some pasta into a pot or pan
  • Boil some water and pour it over the pasta, salt the water and turn the heat up to max. 
  • While the pasta is cooking
  • In a pan, heat up a few sprays of extra virgin olive oil or about a teaspoon-tablespoon of sunflower oil.
  • One the oil is hot, stir in the shallots, salt them and let them cook till their colour starts to change.
  • If you choose to cook with spinach, cut it irregularly, stir it into the onions and let it wilt a bit
  • Stir in he tomato sauce and cook until it starts to reduce.
  • Season with salt and African pepper and stir well.
  • In small bits, add the pasta to the pan tossing or stirring after each portion added.
  • Cook for about a minute seasoning a little more.
  • Add about a tablespoon of the Dolmio tomato sauce, stir, turn off the heat
  • Serve

Yum!! :)

Tuesday, December 31, 2013

The Real Orange Juice


I call this 'The Real Orange Juice' because it is some really ORANGE juice. It's super healthy (loads of health benefits) and also super yummy. Back in Somerset, I used to walk down to a little store that we called 'Mozzies' (not its real name, though) and I bought some orange and carrot juice there that I loved. Since I got back to Southampton, I have kind of craved this juice for a while so today, I decided to try making it. It was a messy job (the juicer needs a guard or something at the tap area), but this juice tastes really good!

So, here's my recipe:

Ingredients

6 carrots
2 oranges


Method

In a juicer, juice 6 relatively long carrots. When done, place a sieve over the container (I used a jug) you juiced the carrots into. Place the oranges on a hard flat surface (I used the kitchen counter) and press down on it with either your palm or the side of your hand and roll the orange on the surface till it feels soft all over. Then cut it in half and hand squeeze it into the container with the carrot juice making sure the orange juice goes through the sieve (to prevent seeds from getting into the drink).
Et voila! That's all!

Ensure you shake or stir the juice before drinking it each time as the carrot juice will separate over time.

I promise you, this juice tastes really good!

Let me know what you think if you try it. :)

Monday, December 23, 2013

Onion Rings


Heyo!

I absolutely love onion rings! Dunno why. And I seem to be craving them right now. Yum! Yum!
So, here's a recipe for onion rings:

Ingredients:

  • White flour
  • Baking powder
  • Eggs
  • Onions
  • Milk
  • Salt
  • Pepper
  • Oil of choice

Method:
  • Combine all the dry ingredients in a bowl
  • Add the milk and the eggs and mix very well to form a batter
  • Spice up the batter with as much salt and pepper as desired mixing up the batter again afterwards.
  • Cut up the onions horizontally to form circles of your desired thickness
  • Push at the inside of each circle you've cut out to let the other layers of onions (the other circles that form the inside of the onion) fall out.
  • In a frying pan, heat up some oil (enough to do a light deep-fry)
  • Once the oil is hot, pick up an onion ring and dip it in the batter then place the onion ring in the oil not touching it till it is ready to be turned over.
  • Turn over when it's time and let the onion rings fry till they are golden.
That's all! Simple and easy! Voila! Voila! Et Voila!
Let me know what you think about the onion rings if you try them.


~Sammy


p.s It's 5:09am, I haven't slept all night, but I had to share this recipe!

Saturday, December 21, 2013

Veggie Burger


¡Hola!

So, I'm sure it's no surprise that I'm going to be putting up a recipe for veggie burgers and not regular meat burgers.
Now, this recipe is going to have things that it's easier for me to get my hands on here. However, I will put in brackets (parenthesis) popular alternatives to those ingredients.
D'accord! On y va!


Ingredients:

  • Black eyed beans (black turtle beans)
  • Rice (quinoa)
  • Onions
  • Peppers
  • Mushrooms
  • Bread (breadcrumbs)
  • Spices/Seasonings/Herbs
  • Salt
  • Oil of choice
  • Optional ingredients - eggs, sun dried tomatoes, a bit of a sauce like piri piri or BBQ sauce
  • Burger bread/bun
  • Lettuce
  • Tomato slices
  • Cheddar cheese
  • Optional ingredients - slices of onion, a bit of a sauce like mayonnaise, piri piri or ketchup

Method:
  • Soak the beans for about 30-1hr in warm water (or slightly hot to reduce soaking time) then leave them out on a paper towel or cloth to dry up to at least 90%.
  • Cook the rice till it's nearly done (not fully done)
  • Cut up the peppers and onions and run them through a food processor then put them into a frying pan with a bit of oil and cook them a bit to release their flavour.
  • Cut the mushrooms into halves or quarters.
  • Stick a couple of slices of bread in the oven till they are hardened and can break relatively easily. Then stick them in a food processor or blender to make the breadcrumbs).
  • Toss the mushrooms into a food processor and turn it on (you could use the pulse) till they are almost all pasty then add in the beans and the rise and turn on the food processor again. Add the onion and pepper mix and repeat. Put in your desired amount of salt, spices, seasonings and herbs (and the optional ingredients if you choose to use them (the egg helps with making the mixture stay together)) and repeat then add the breadcrumbs a little at a time turning on the food processor each time breadcrumbs are added till you have a kinda pasty mixture.
  • Shape the mixture into patties of your desired shape and size (using wet hands to shape the patties might prevent them from sticking to your fingers. You could also spoon out some patties onto a surface with flour on them and sprinkle some flour over the patties before picking them up and shaping with your hands)
  • Heat some oil in a frying pan and place your patties in the pan leaving them to fry for a while before flipping over.
  • Slice you burger bread/bun in half (horizontally) and if you choose to have a sauce, spread some on the inner side of the bottom half of the bun then place your patty over it then your cheddar cheese then the tomatoes, lettuce, onions, a bit of sauce again (if you choose to have it) and then the top half of the bun (in the order mentioned).
Bon appétit! :)

Monday, December 16, 2013

An Amazing and Healthy Wrap


I made wraps yesterday for my cousins and I and they tasted WAY better than I expected so I decided to tell you guys about it and give you my recipe.

So, the wraps were healthy and I know people that that word (healthy) makes them cringe. Guess which word in this almost makes them stop breathing: it's vegetarian too.

I'm vegetarian so it is expected that when I cook, there's a 99% chance that I'm going to make something vegetarian and a 95% chance I'm going to make something vegan.

Okay! So here are the ingredients:

  • Cut and frozen bell peppers (red, green, yellow and orange)
  • Sunflower Oil
  • Frozen plum tomatoes
  • Frozen onions
  • Eggs
  • Salt
  • Wraps (bought from ASDA)
  • Peri-peri sauce
Here's how this delicious wrap was made (oh! and I made this for 5 people):
  • I got out as much of the peppers, onions and tomatoes as I thought was needed and put the rest back in the freezer (you shouldn't let them defrost if you're not going to use them immediately)
  • In a sauce pan, I heated up about a tablespoon of sunflower oil then tossed the onions in and sprinkled some salt on them. I let them cook for a while before adding the tomatoes and stirring.
  • After about 2 minutes, I added the peppers, stirred it and left it to cook stirring occasionally.
  • I broke 11 eggs and beat them till they were fluffy, added a pinch of salt and beat them again.
  • In a large frying pan, I heated a little of sunflower oil then moved the pan around to make sure the oil got everywhere I thought the eggs would then I poured in the eggs.
  • As the eggs were heating up and the sides starting to solidify, I used the frying spatula to move those solidifying parts to the middle for a while (the liquid part of the eggs will run to where the solidifying parts were over from).
  • After doing that for a bit, I let the egg be and fry then I turned it over so the other side could fry. Once done, the eggs where cut up into much smaller bits and then put in a large bowl.
  • Still stirring the contents of the sauce pan occasionally, I added a bit more of the sunflower oil (because the water content from the frozen veggies had reduced till it was practically all gone). 
  • I stirred the contents up a bit more and let them cook then took the sauce pan off the heat once I thought the veggies were done.
  • The wraps were heated in the grill part of an oven (they had been kept in the freezer to preserve them between when they were bought (in October) and now).
  • Once the wraps were warm enough, they were placed on individual plate and one 1/3 of each wrap, the veggies where put in a vertical line then then the eggs put on on top of them. A few drops of peri-peri sauce was added then the wraps were rolled into a perfect cylinder with the veggies and eggs (with the peri-peri sauce on them, of course) in the middle of it. One end was folded up and that was it!
This wrap filled me up quickly (and 3 of the wraps filled up one of my cousins :) ). We all loved it and it was great that it was healthy.


Let me know if you try it out some time, okay?

Ciao,
~Sammy

Thursday, August 29, 2013

Healthy Little Sauce

><>


Hello, everyone,

When it comes to sauces, I prefer to work with only natural resources. This means that I prefer not to cook with things with synthetic ingredients. Therefore, I avoid tomato purées (I know some are said to be fully natural, but I still avoid all of them).

I just had a late dinner and I made a little sauce with it. With this sauce, my aim was to preserve as much of the nutrients in the ingredients as possible and to keep the sauce simple. So, I didn't cook the sauce for a long time. I'll put my recipe below:

Ingredients

A quarter of a red bell pepper
A little bit (less than the pepper) of an onion
A little sprinkle of black pepper
4 fresh tarragon leaves (picked from my garden)


Preparation

Slice the red pepper into not-so-thin strips and chop the onions and the tarragon.
Heat a little oil in a pan turning off the heat when the oil's hot.
Pour the ingredients together into the pan and stir for approximately 8 seconds.
Take the ingredients out of the pan and onto the dish you plan on serving it in.

And.....that's all.


With this process, a smaller amount of the nutrients in the ingredients are destroyed due to the heat used in cooking.

I am done eating and I can tell you that that little sauce was good!


Here's another healthy sauce recipe:

Ingredients

Fresh vine tomatoes sliced into quarters or sixths depending on the size of the tomato
Half of a medium sized onion, chopped
A pinch of black pepper
Herbs of your choice in your desired quantity
A tiny bit of ginger (and garlic if desired)
Bell peppers of your choice
A bit of olive oil


Preparation

Toss all the ingredients in a bowl till they are well mixed.
Cover the bowl with cling film making just one hole in the middle.
Keep the bowl in a warm, dry place for about 2-4 hours.

And....that's it! 


The second recipe doesn't require any cooking so, I guess it's even healthier. Okay! I don't guess. I KNOW it's healthier.

Let me know if you try out these recipes and what you think about them.

Enjoy! :)


><>

Friday, August 2, 2013

Recipe: Yorkshire Pudding


In my family, we absolutely love Yorkshire pudding! My cousins and I, when we were younger, came up with a silly theory that it was because we're Yorkshire. By the way, I've never been to Yorkshire, believe it or not. Anyways, here's a recipe for my beloved Yorkshire pudding:

Ingredients

140g plain flour or all-purpose flour (this is about 200ml/7fl oz)

4 eggs (200ml/7fl oz)

200ml milk

sunflower oil, butter or vegetable oil, for cooking

1 1/2 teaspoons sugar (optional)

1/8 teaspoon salt (optional)


Preparation method

Heat oven to 230C. Drizzle a little sunflower/vegetable oil (or cubes of butter) evenly into 2 x 4-hole Yorkshire pudding tins or a 12-hole non-stick muffin tin and place in the oven to heat through.

To make the batter, pour 140g plain flour into a bowl and beat in four eggs until smooth. Gradually add 200ml milk and carry on beating until the mix is completely lump-free. You could use a mixer at medium speed if you don't want to mix the ingredients manually.

Season with salt and sugar and mix.

Pour the batter into a jug

Remove the hot tins from the oven.

Pour the batter into the holes carefully and in equal quantities.

Place the tins back in the oven and leave undisturbed for 5-10 mins then reduce the heat to about 175C still leaving the tins undisturbed until the puddings have puffed up and are golden.

Serve immediately.


Thanks for reading!


If you try out this recipe, please let me know what you think about it. 
 

The Different Ways to Cook Plantain

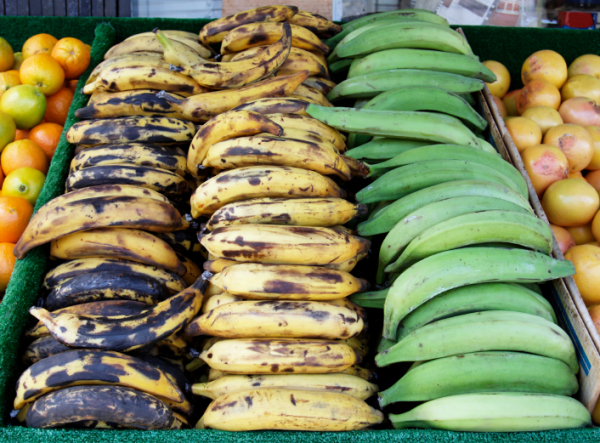
No, these are not bananas!

I made reference to plantains in my last blog post.

In Nigeria, plantain is eaten quite often, alone, with chips (french fries), with different rice dishes (when fried), with yams, sweet potatoes, anything but soups (but I eat it with leafy Nigerian soups instead of the "traditional" things those soups are eaten with (I can't stand those things), but I only eat Nigerian soups once in a long time (maybe once or twice a year, dunno)).

The semi-ripe (ripe) and ripe (very ripe) plantains (the plantains to the left and at the centre in the picture above) are usually the ones eaten. However, from time to time, my mum makes the unripe (green) one into some dish for me to eat because the unripe plantains are rich in iron and I am anaemic (iron-deficient).

Anyways, there are different ways plantains can be cooked. However, I am only going to talk about plantains being boiled, fried or roasted (not made with dishes). Below, I am going to describe how these are done:


Fried Plantain


This is what I ate a few days ago.

To make this, you need to heat some oil up in a deep fryer. While the oil is being heated (to the maximum temperature (or about 190C), peel and cut the plantain into whatever shape you want (I have tutorial photos of this, but I can't get to them now). Put the cut plantain pieces into a bowl, add about a pinch of salt to the bowl (or more, depending on the quantity of plantain used) and toss and turn the bowl around. I usually put a lid on it and shake the bowl up and down, left and right, turn it around a bit and all.

 
Made it myself!
Once the oil is heated fully, pour the plantain into the basket in the fryer, put the lid on the fryer and put the handle down so the plantains are submerged in the oil. Take the plantains out when they are about as brown as the ones I made in those pictures. Put them in a sieve-basket, on a cheese cloth or just shake the fryer basket a bit to get rid of most of the excess oil on the plantains and serve.

Be careful, the inner parts of the plantains will be really hot so you might want to leave them to cool for about a minute.


Boiled Plantain


When making "boiled" plantain, you need to have a pot with water boiling in it on the stove. While the water is heating up, you get out plantains and cut off their heads and tails (toss them in the trash). Leave the skin on the plantain and every few centimetres or every inch or so, you cut down on the plantain (or you don't even have to cut it, depending on how you want the plantain).
Place the plantain pieces in the pot of hot water, pouring some salt in after them and leave them in there (with the heat still on) until they are soft (but not WAY too soft). I have never cooked this, and the last time I ate it, I was a really little girl in Africa, but I'm guessing
about 15-20 minutes should do depending on how hot the water was when you tossed them in.

When the plantains are done, take them out of the pot and leave them out to cool for a bit. Make a slit in the skin of the plantain and peel it off then serve with a sauce of choice.


Roasted Plantain


 No jokes, you can find this being cooked on the streets of Nigeria (well....the pavements/sidewalks) by ladies  and that random spot where it is made is called, "Mama Put" (like "mama, put it in my plate!" unfortunately, it's served in newspapers and in the process of making it, fumes from vehicles and dust would've gotten on it, but that's not how I'm going to teach you to make it. We're going to make it household style.)

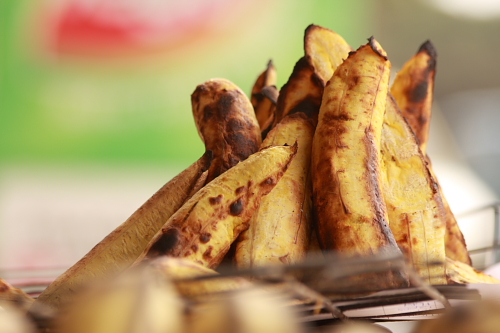
Cut of the head and tail of a plantain, peel the plantain and then toss it into an oven (about 200-250C) or pop it on a grill and let it cook till it looks like the pictures to the left. If the plantain is really ripe, let it get a bit darker. If you have a line of black (like the black parts on the plantain to the left of this), don't worry about it, but don't let the whole plantain go black!


Now, I'm going to get a pictorial for you guys to know how to peel a plantain and then I'll end this:

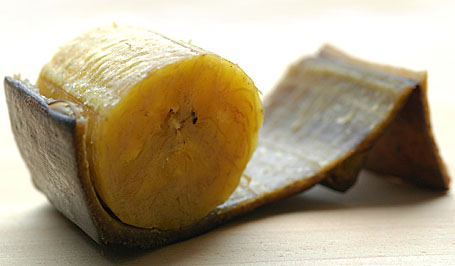
1-2. Cut of the head and tail; 3. Make a slit with the tip of a knife down the length of one side of the plantain; 4. Pull up the skin from the slit; 5. Peel off the entire skin; 6. Get ready to cut or pop into the oven or on the grill!


Thanks for reading!

Recipe: Jollof Rice


Jollof rice ("gel"-"loff") is an African food. It is popularly eaten in Nigeria. I don't think I've ever been to a Nigerian party and not seen Jollof Rice. In schools in Nigeria, you can find it on their menu!
I'm not a huge fan of this (I'm not a huge fan of anything), but people love this (including non-Africans) and I have a recipe for it (that is not the traditional recipe, if there is one). So, here it is:


><>

Ingredients
1-2 tbsp pure vegetable oil or canola oil

1 large onions, sliced

8 medium-sized frozen tomatoes

4 tbsp tomato purée

2-4 chilli peppers (or any hot pepper) chopped irregularly

Thyme leaves or basil(to taste)

1 tsp ginger

225g/8oz long-grain rice

Salt (to taste) (optional)

1-1.5 tsp sugar (optional)


Preparation method

Place the frozen tomatoes in a bowl of hot water to defrost.

Rinse the rice well to remove excess starch then cook it till it is almost done.

Pour out the water the tomatoes are in, make holes in the tomatoes (using the tip of a knife) and drain the liquid in them into the bowl.

Cut the tomatoes irregularly

Heat the oil in a large pan (saucepan/pot) and cook the onions over a gentle heat until translucent.

Stir in the tomatoes and let it fry for a few minutes.

Add the tomato puree and stir. Let what's in the saucepan fry for about a minute.

Add the liquid drained from the tomatoes, a little at a time, to what's in saucepan and stir. You should have something like a semi-thick sauce. 

Let the "sauce" cook for a few minutes stirring continuously.

Add the peppers and ginger and continue stirring. For about half a minute.

Add the salt and the sugar and stir for about a minute.

Turn off the heat

Add the rice to the contents of the sauce pan and stir till every grain is coated, you can add a little more oil and a little water to the saucepan and stir.

Turn the heat back on (high) for about a minute stirring continuously to make sure every grain is coated then reduce the heat to low.

Cover the saucepan and let the contents of it cook a bit long, or until the rice is fully done or closer to done.

Serve.


><>


In Nigeria, most of the time, Jollof rice is eaten with plantains on the side. I don't know where plantains can be found anywhere, but in England and African countries. In African countries, it can be found in any food-selling local marketplace and in England, in Indian grocery stores or supermarkets.
I will talk about making plantain in a different blog entry.


Thanks for reading!


If you try out this recipe, please send me a picture of your finished dish and a review of the dish.

DIY: Vegetable Stock


I never cook with a different stock. You know the reason.

Okay! so, I use vegetable stock to make various dishes like spicy rice, sauces, et cetera. How do I make my vegetable stock?

Basically, I throw vegetables I find around into a pot with water and boil them for about an hour. My stable vegetables for this are onions, ginger and tomatoes. The last time I made vegetable stock, I noticed I had run out of a lot of vegetables so I went in search in the fridge, freezer, pantry till I finally found some stuff. I threw in two tomatoes, about a whole medium-sized onion, sweet corn (found it in the freezer and it didn't look like anyone wanted it), frozen peas, ginger, I think I added a bit of a green bell pepper too, thyme, Italian Seasoning (herbs), salt, bay leaves and two red, "hot" peppers. Like I said above, I boiled them for about an hour then I poured the contents of the pot into a sieve and stored the liquid (stock) in a bowl. I actually used all the stock when I was cooking then, but if I don't use it all, I save it in a bowl and put it into the freezer.

You can easily make vegetable stock by storing random things from vegetables in a bowl. For example, if you get a liquid out of a tomato (say it was frozen and you defrosted it), you can put it in the bowl and use the tomatoes for what you brought them out for. If you don't use all of a carrot or you have a bit of the carrot left on the....I'll call it stub.....you can toss it in the bowl, if you have spinach you use all, but a little bit of an onion, toss the rest in the bowl, if you open a tin of sweetcorn or a bag of peas and you don't use it all, you can toss the rest into the bowl or just pour a bit into the bowl and keep the bowl in the freezer. When you're ready to make some stock, pour the contents of your bowl into a pot, add water to it and boil them for about an hour! Simple!

Even with the above, I believe the perfect vegetable stock should be made with onions, tomatoes, ginger, carrots, mushrooms, cabbage and some herbs (and maybe a bit of a green vegetable too).

As usual, just toss 'em in a pot, pour in some water, turn on the heat, put a lid on the pot, let the water boil with the vegetables for about an hour.

Stocks are best used fresh, but if you don't use it all, remember, store it in a clean bowl in the freezer.

*When defrosting your stock, pour a bit of water over it in the pot your defrosting it in so it doesn't evaporate, or leave sticky burns at the bottom of your pot as it melts.

Introduction

Hello,

My name is Samantha, I am a natural hair blogger and founder of ♥ ❤ ❥ ❣ ❦ ❧SammyWithTheBigHair♥ ❤ ❥❣ ❦ ❧, a teen activist, an outreach specialist for TeenActivist.Org, Singer/Song-writer.... and now, a food blogger.

I was initially going to just wait and start a food channel on YouTube, but like, now, at 00:41, an idea popped into my head, why not just start a food blog? So, that's what I'm doing.

I cannot guarantee how often I'll upload things on here, but I will upload something every now and then and you can send me recipes to review so I can have something to upload if I don't upload in a while.

Okay! So, I'm not really an eater, but I cook from time to time. I don't eat many foods (I sorta have an eating disorder called SED. Here's something I wrote on how it is for me, because you won't find exactly how the SED is for me online). I won't bother putting up a list of the things I don't eat on here because that'll be extensive (by the way, I'm only allergic to one thing).

My cooking is mainly Asian, European and African inspired. I usually embrace my two cultures when cooking (English and Nigerian). Sometimes, I cook something rather European and spice it up with some hot pepper to make it kinda African (by the way, I don't find peppers or chillies hot for some reason), other times, I cook something European and add an Asian twist to it and maybe do the pepper thing to make it a bit African. Sometimes, I just make something African in a unique way.

I read cookbooks, but I don't follow the book. I tweak things a lot aaaaaand, basically, I just flip through cookbooks and look at ingredients to find some ingredient I don't mind cooking with. Once I find the ingredient, I start thinking up things to cook and then I make them.

Another thing, I'm vegetarian. I say I've been vegetarian for 6 years, but the thing is, I started off as a vegetarian then a pollo-pescetarian then a pollotarian (not eating the flesh, though) then fully a vegetarian again. Some people call that pollovegetarian, but as long as meat it was part of a living, breathing, heart pumping, blood flowing, moving creature, I don't consider it a vegetarian diet. The thing is, I fight for animal rights (cruelty), yeah, but that's not my reason for being vegetarian. I actually just hate the taste of meats. That's it. By the way, I'm lacto-ovo-vegetarian.

I'm Christian, I believe that Jesus really lived, He really died on the cross for my sins and that He really rose again on the third day. Jesus is my Redeemer, Saviour and Friend. I am a non-denominational Christian, but I go to Pentecostal churches. I'm non-denominational by choice because I don't want to base my faith on what a sect or denomination tells me to. I want to read the Bible and find the truth for myself.

Okay! So, there are going to be few recipes with meats, but there will be some up. The ones uploaded will usually be with seafood, by the way. I don't taste food while I'm cooking if it contains meats. I just hope the food turns out good and it does (thank God!). I don't touch raw meats, by the way, that's why. I made crunchy spiced calamari fillets two days ago and I used prongs to hold the calamari fillets during every process till the calamari was done being cooked. I don't go to the butchers/meats sections in supermarkets because I can't watch raw meat being cut and the smell of blood....gaah...I can't stand blood.

Anyways, so that's it!
Remember, send me recipes, reviews, whatever!

~Samantha